Sunday 26 February 2012

Capsicum (green bell pepper) rice

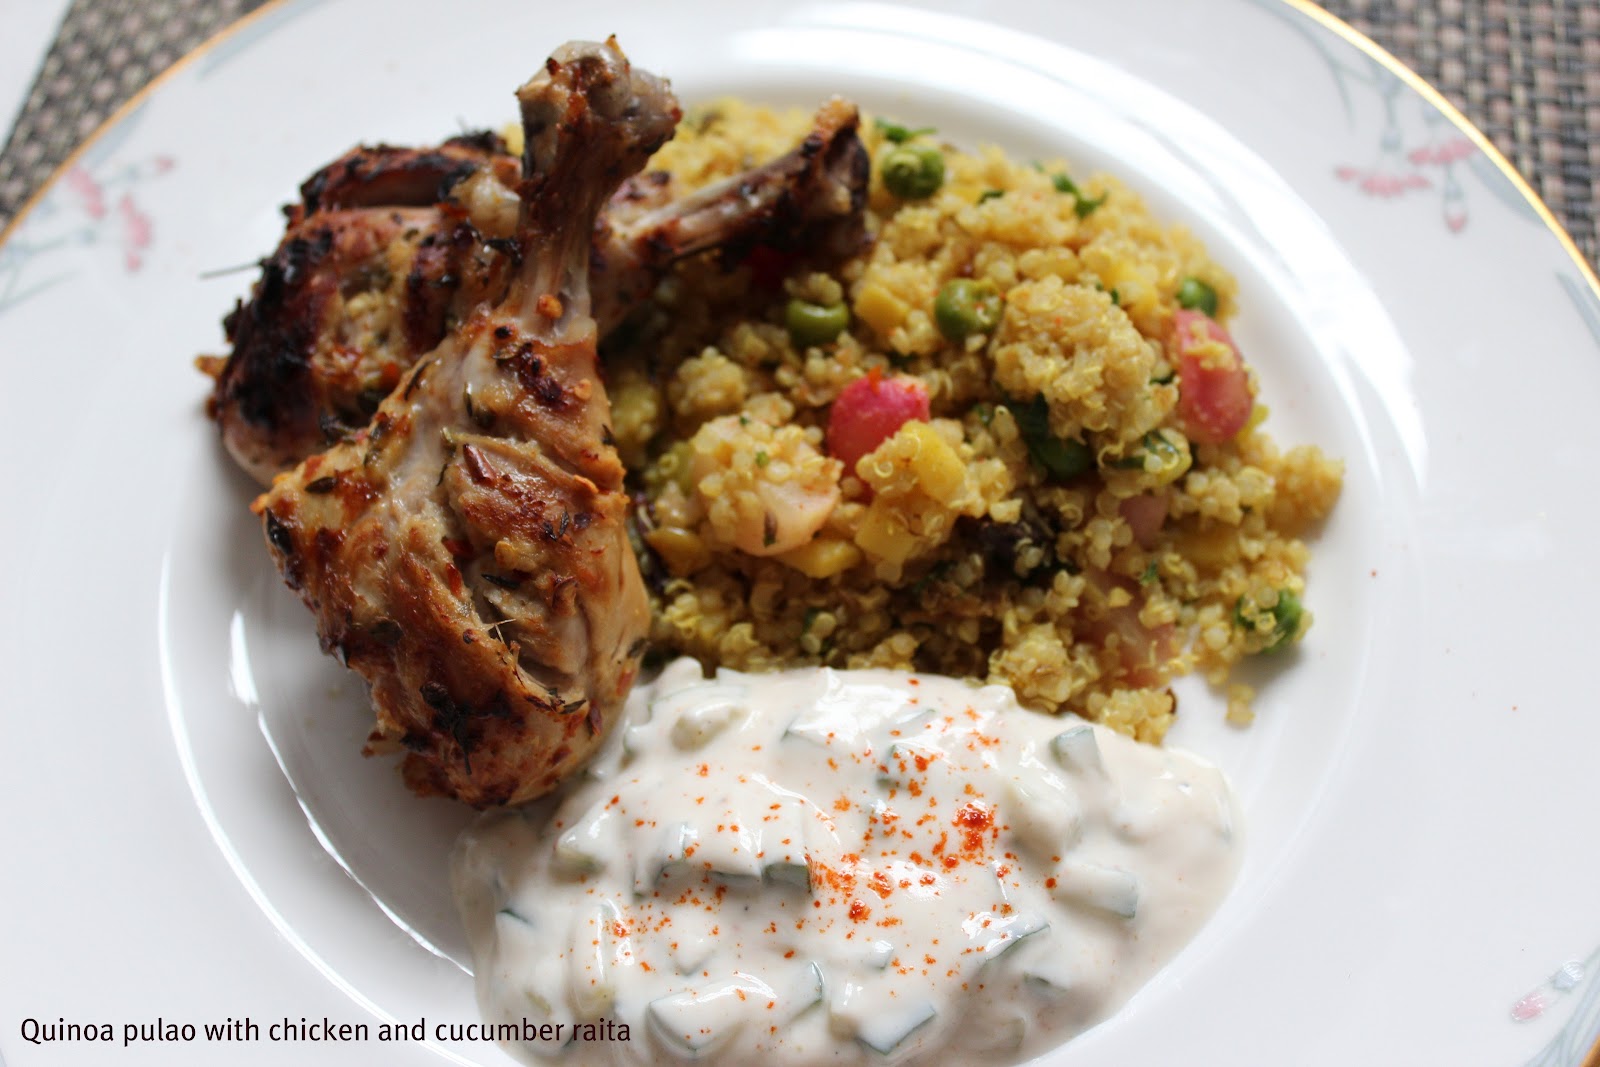
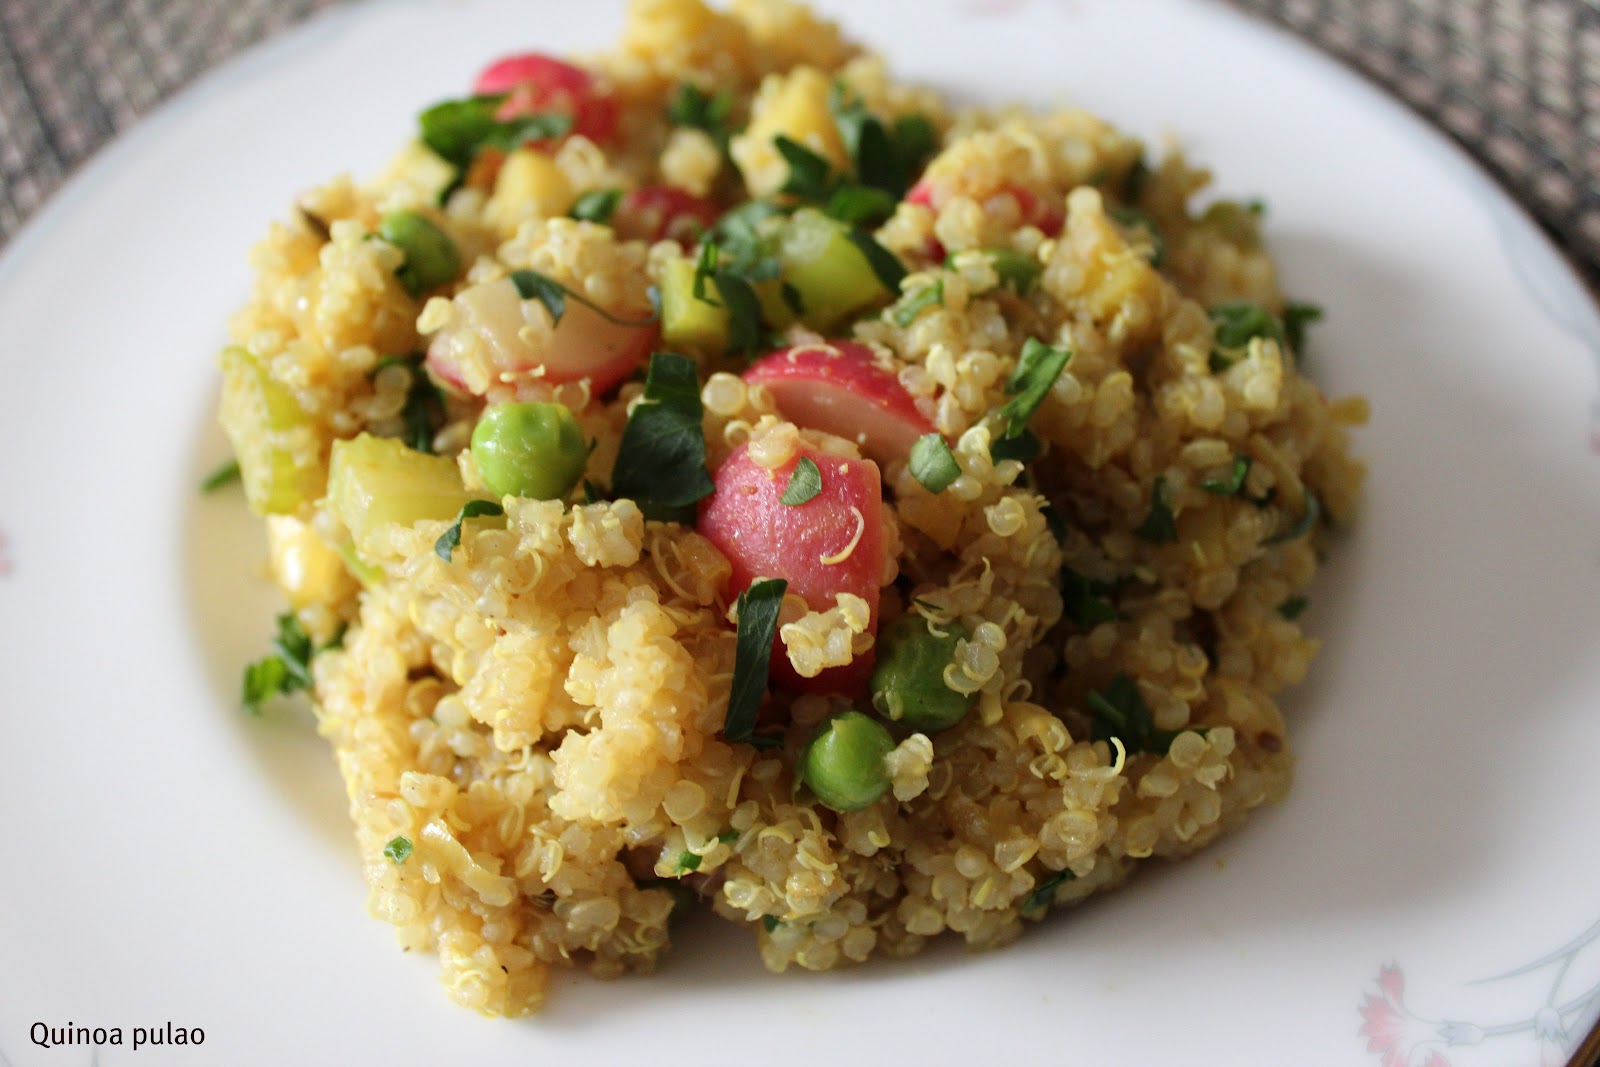
This is one of those recipes I reach for when I am pushed for time. It is quick and flavourful and doesn't need anything fancy as a side. You can have with just plain yogurt, papad or potato crisps and little bit of lime pickle. The only preparation you really need is to cook and cool the rice ahead of time. But even that is acceptable as you don't have to keep an eye on it all the time.  It is in fact a great way of using up left over rice. I prefer to keep the cooked rice in the fridge for an hour at least before making such dishes. The cold tends to draw out the moisture from the rice, so it doesn't stick together and you don't have to be delicate when mixing it.

The spice blend can be made ahead and stored in an air tight container for long time.


Spice blend
1 tbsp chana dal (split bengal gram)
1 tbsp urad dal (split black gram)
5-6 dried whole red chillies
2 tbsp coriander seeds
1 tsp cumin seeds
3-4 cloves
1 inch cinnamon stick
12-15 curry leaves

Dry roast all of these individually and then powder them in a spice blender or a coffee grinder. 

To make the rice
2 green capsicum (bell pepper), diced into 1cm pieces
2 tsp fresh ginger, chopped finely
3 cups cooked rice
2 green chillies, chopped
1 medium onion, sliced
5-6 curry leaves
1 tsp cumin seeds
1 tsp mustard seeds
1 tbsp tamarind extract (optional)
2-3 tsp lemon juice
handful of coriander leaves, chopped
11/2 tbsp oil
1/4 tsp turmeric powder
2 tbsp of the spice blend
2 tbsp fresh grated coconut (optional)
Salt to taste
  • Heat the oil in a large pan. Add the cumin and mustard seeds when the oil is hot and allow them to splutter.
  • Next add the onion, ginger, green chillies, turmeric and curry leaves and sauté till the onion has cooked and softened.
  • Add the capsicum pieces and fry over high heat for 2-3 minutes. Add a little salt, turn the gas to medium and cover and cook till the capsicum has cooked. Don't add any water. This may take between 7-10 minutes. Stir a few times in between so it cooks evenly.
  • Next, add the spice blend and sauté for 2-3 minutes. Sprinkle a little water to prevent the spices from burning. Also add the the tamarind extract at this stage if you are using it.
  • Add the rice to the above and mix it all together till every grain of rice is coated well. Check and adjust the salt as required.
  • Toss in the coriander leaves and grated coconut (if using). Finish off with the lemon juice. You may need more of this if no tamarind was added at the earlier stage.
  • Cover and continue to cook for 4-5 minutes on a low flame to allow all the flavours to combine and the rice the is heated through.

Serves 4

Shrikhand (strained yogurt) with strawberries macerated in Port wine

Shrikhand is a popular western Indian dessert. It is a staple sweet dish in Gujarati and Maharashtrian cuisines. It is actually quite simple to make, especially when you can buy good quality yogurt from the supermarket. Traditionally it is made with curd made with full cream milk. The curd is then hung in a muslin cloth for a few hours or even overnight. The whey drains out leaving behind a thick creamy curd. This is the time consuming part of this dessert. Thankfully, you can shave off a few hours by using a Greek yogurt of any kind - full fat, low fat or even fat free, personally preference being low fat.  Once the desired consistency is obtained, all that remains to do is to sweeten and flavour the curd. Cardamom and saffron are the more common flavourings. Other variations add mango pulp to make the popular Amrakhand.

My variation uses vanilla as the base flavour. I have used a 500g tub of Greek yogurt which makes 2 servings. I have also steeped the strawberries in reduced Port wine and used this as a topping and sauce. This, infact makes a good topping for ice creams as well.


500g low-fat yogurt
2-3tbsp sugar
1 tsp good vanilla extract
Muslin or cheese cloth

For the topping
4-5 strawberries
4 tbsp good quality Port wine
11/2 tsp sugar
1 tsp vanilla extract

To prepare the topping
  •  Boil the Port wine along with the sugar and vanilla in a small pan. Reduce it to a syrupy consistency. It should just start to coat the spoon. 
  •  Allow this cool. It will thicken slightly as it cools.
  • Meanwhile, hull and quarter the strawberries. Add the strawberries to the reduced Port and mix well.
  • Allow this to marinate in the fridge for at least half an hour.
To prepare the yogurt
  • Line the inside of a large strainer with the muslin. The muslin the strainer should be big enough to hold the quantity of yoghurt. Place this over a large bowl in order to collect the whey that drains out. 
  • Pour the yogurt into the muslin lined strainer. Bring the ends of the cloth together and tie it lightly at the base.
  • Place a small plate of top of this and place some kind of a weight on top. A tin of tomatoes or something equivalent will do nicely.
  • Keep this in the fridge for at least 3-4 hours or overnight if you like . If a lot of water collects in the bowl, you may have to drain it in between. The curd will form a solid mass but will feel very creamy to touch - not unlike slightly softened ice cream.
  • Transfer the curd to a bowl and beat in the sugar and vanilla extract. The sugar quantity I have mentioned here is just a ball park figure. You can add as much or as little as you like.
  • Transfer this into serving bowls and chill in the fridge for another 20-30 minutes to allow the sugar to dissolve fully. 
  • Add the topping when ready to serve and serve chilled.

As mentioned, the above quantity makes 2 servings. 

Saturday 25 February 2012

Butternut squash and chickpea (chana) subzi masala

I wasn't familiar with this variety of squash till I moved to the UK. This is a winter vegetable and  is very similar to the yellow pumpkin, just sweeter. It is really lovely when simply cooked or roasted or made into soups, but it can also stand up to complex Indian cooking. The inherent sweetness mellows down the spices and heat.

This is a versatile side dish that goes well with rotis or rice. I tend to use a lot of chilli to balance the sweetness of the squash. I have also used black(kala) chana (chickpea) here just to add a contrasting colour and texture. You can always substitute it with the more common light coloured chickpea. Black chana has more of a bite compared to the more common Kabuli chana because of its thicker skin and has a slightly nuttier taste. We use it a lot in Kerala cuisine. Because of their hardy nature, both types need to be soaked in water for a long time before they can be cooked. That's fine when you are planning ahead, but I always keep a few tins of both varieties in the pantry to cater for those impromptu cooking sessions.


500g butternut squash, cut into 1cm pieces
2 tsp ginger-garlic paste
1 medium onion, chopped finely
1/2 cup cooked chickpea
5-6 curry leaves
1/2 tsp cumin seeds
1/2 tsp mustard seeds
1/2 tsp cumin powder
1 1/2 tsp coriander powder
1/2 tsp red chilli powder
1/4 tsp turmeric powder
1 tbsp cooking oil
Salt to taste
handful of coriander leaves, chopped
1/2 tsp garam masala (optional)

  • Heat oil in a wide pan. When it is hot, add the cumin seeds and mustard seeds and allow them to splutter.
  • Add the curry leaves, onion and the ginger-garlic paste and saute till the onion has softened, but not browned.
  • Add the turmeric, cumin, chilli and coriander powders and saute for 10-15 seconds being careful not burn them. Sprinkle a little water if they are catching at the bottom.
  • Add the squash pieces and saute for a 2-3 minutes.
  • Add the chickpea and salt and mix everything together. Add 4-5 tablespoons of water and cover and cook on a really low flame till the squash is cooked. You just need a little water to create enough steam to cook everything. 
  • Finish the dish with some chopped coriander (and optionally garam masala) when the squash has cooked and all the water has been absorbed.

Sunday 19 February 2012

Zesty orange rice with rosemary and fennel

Another weekend and time to try something new...

We are all used to spicy lemon rice down south. I wanted to try out something similar using oranges. Surprisingly, the sunniest of all fruits are in season during dullest months of the year.

The rice came out very mild and fragrant and I think will be a good accompaniment for strong spicy curries. The sweetness of the oranges mostly cooks out leaving a lingering sweet aniseed flavour. I used rosemary, star anise, fennel and green chilli to add the spice component. Rosemary isn't an herb I am very familiar with but I thought the strong aniseed flavour of fennel and star anise would go well with it.


1 cup basmati rice
2 stalk of celery, chopped
1 medium onion, chopped finely
5-10 green chillies, chopped finely (depending on the heat in the chillies and your heat quotient)
2 sprigs of rosemary
3 navel oranges
2 tsp ginger-garlic paste
3-4 star anise
2 tsp fennel seeds
1/4 tsp turmeric powder
1/3 cup frozen peas
4 tsp cooking oil
Salt to taste

Wash the rice a couple of time to remove the starch and then keep it soaked till while you prepare the rest of the ingredients. Soaking helps the rice to elongate while cooking.

Remove the rosemary leaves from the stalk and chop finely. Zest the oranges first using a grater before extracting the juice and keep aside.

Roast 1 teaspoon of fennel seeds in a dry pan for a few minutes and grind them to a fine powder in a pestle and mortar. This will be added at the end of the cooking process.

Boil at least 11/2 cups of water in a kettle and keep ready.

  • Heat the oil in a pan. Add the star anise to the hot oil and toss for a few seconds. Follow this will the 1 tsp of fennel seeds and allow them to splutter.
  • Add the chopped onions and sauté till they are softened and translucent. We don't want the onions to brown.
  • Add the turmeric, chopped celery and chopped green chillies and sauté till they are also softened.
  • Drain the rice well. Add it to the pan and fry it for a few minutes till the rice turns opaque and the crackling sounds have mostly gone. You'll need to keep stirring on a medium heat, otherwise the rice will catch at the bottom of the pan.
  • Add the zest and juice of the oranges to the rice along with the salt and stir to combine. Follow this with enough boiling water to just cover the rice. I eyeball this, but in theory you need 11/2 times the amount of liquid for every cup of basmati rice. This quantity will include the orange juice as well.
  •  Cover and cook on a low heat. If you are using garden peas add it at this stage along with the water. Petit pois don't need much cooking, so they can be added half way through the cooking. You can also add more water (few tablespoonfuls) at this stage if needed. The rice will require about 7-10 minutes to cook with the lid on. Don't keep taking a peek as you'll let the steam escape and it will take longer and may require more water.
  • When the rice is cooked, turn off the heat. Add the roasted fennel seed powder and stir to combine. Cover and let it sit for some more time (about 10 minutes). 

Serves 3-4.

Sunday 12 February 2012

Cucumber raita

This makes a good cooling accompaniment to any spicy dish.


1 cup cucumber, de-seeded and chopped finely
1/4 tsp chilli powder (optional)
2 tsp lemon juice
1/4 tsp toasted cumin powder
250g low-fat Greek yogurt
Salt to taste

Mix all the above together and leave to sit for sometime in the fridge (30 minutes to an hour) before serving.

Quinoa pulao with chicken and cucumber raita

Woke up this morning wanting to try something totally different. I had bought a pack of quinoa a few weeks back, but hadn't found the time to use it. Today seemed as good a day as any to experiment with that. I also had some chicken in the fridge that I had planned to make a curry with later on. I decided to use it as an accompaniment to the quinoa instead as a special treat for my husband. Since both the chicken and quinoa were dry dishes, I also made cucumber raita as a side.

I have posted these separately. You can also follow the links listed below.


Chicken drumsticks with lemon and thyme

Quinoa pulao

Cucumber raita


Chicken drumsticks with lemon and thyme


6 skinless chicken drumsticks
2 tbsp thyme
11/2 tsp garlic paste
2 lemons, unwaxed
3 tbsp red chilli flakes
Salt to taste
Butter for basting


  • Prepare a marinade by combining the zest and juice of the two lemons, chopped thyme, garlic, salt and the chilli flakes.
  • Score the chicken pieces. Place them in a bowl. Pour the marinade and rub it in for a few minutes using clean hands.
  • Cover with a cling film and refrigerate for several hours or overnight if possible.
  • Pre-heat the oven to 180C. Remove the excess marinade from the surface of the chicken and place them over a rack in a roasting pan. Cover with aluminium foil and bake in the oven for 40-45 minutes or until the chicken is cooked.   
  • Turn the grill on at this stage and crank it up to the maximum. 
  • Remove the foil and baste the chicken with some melted butter. Grill on high on each side for 3-5 minutes until it browns nicely. The milk solids in the melted butter will help with the browning.

Quinoa pulao

Quinoa (pronounced keen-wah) has been on my list of things to try for a long time. As a vegetarian, one is always on a lookout for good sources of protein. Quinoa contains the best protein profile among all cereals and is also a rich source of iron and magnesium. Since it is also gluten free, it can be eaten by people with gluten sensitivity.

Being an Indian and a south Indian at that, we do tend to a eat lot of rice. Over the years, I've moved towards using the more nutritious varieties of rice such as brown or red parboiled rice instead of the regular white rice. These work well for the more traditional curries, but for things like biryani or vegetable pulao, I still stick to plain old basmati rice. 

I was curious to see if I could do a variation of pulao by substituting quinoa for rice. I have to say I was pleasantly surprised by the end result. It actually tasted quite nice - slightly nutty with a small bite to it - and carried the flavors of the various spices very well. 

I used all the left over vegetables I had  in the fridge - parsnip, celery and European raddish - along with frozen peas. You can use any combination of vegetables you like. 


190g or 1 cup Quinoa 
5 cloves
1 dried bay leaf
1 small stick of cinnamon
1 star anise
1/2 tsp fennel seeds
1/2 tsp cumin seeds
1/2 large onion, chopped
2 garlic pods, chopped
2 cups of chopped vegetables (I've used parsnip, celery, raddish and peas here)
5-6 green chillies, slit lengthwise
1/2 tsp cumin powder
1/2 tsp turmeric powder
1 tsp coriander powder
1/2 tsp chilli powder
1 tsp garam masala
3 tsp vegetable oil
Juice of half a lemon or lime
Salt to taste
Handful of coriander leaves, chopped

To cook the quinoa
  • Soak the quinoa in water for 10 minutes. Drain and then rinse thoroughly a couple more times.
  • Cook the quinoa according to the pack instructions. Normally, you will need double the amount of water (in this case 2 cups). Bring it to a boil in a pan, then turn down the heat and simmer for 10-15 minutes until the germ separates from the cover. This is easy to identify as you will see a thin hook like filament separate from the grain. The contents will also have doubled in volume. Turn off the heat at this stage. Cover and keep aside till all the moisture is fully absorbed. 
To make the pulao 
  • Heat the oil in a pan. Add the whole spices (cloves, star anise, bay leaf and cinnamon) and fry in the hot oil for a few seconds. Then add the fennel and cumin seeds and allow to splutter.
  • Add the turmeric, chillies, chopped onions and garlic and saute till the onion softens and turns translucent. If you are using celery or leeks, add it at this stage.
  • Add the vegetables - the hard vegetables first as they take longer to cook, followed by the softer ones - and saute over high heat for a few minutes.
  • Add the chiili, cumin and coriander powder along with salt to the vegetables and mix well. Lower the heat, sprinkle a little water and cover and cook till the vegetables have softened.
  • When the vegetables have cooked, add the cooked and cooled quinoa and mix everything together. Taste and adjust the salt if needed.
  • Sprinkle the garam masala and lemon juice and mix well.  Keep stirring and cook uncovered for a few minutes to allow the flavors to combine. 
  • Finish off with some chopped coriander.
Serves 3-4

Saturday 11 February 2012

Aubergine (eggplant or brinjal) fry

It amuses me how this vegetable has different names in different countries. I have grown up calling this 'brinjal'. While living in the US, I got used to 'eggplant' and now living here in the UK, I call it an 'aubergine'. Whatever the moniker, I do love this vegetable. Most supermarkets here carry the big purple variety. These are lovely when grilled, baked or fried, but for Indian dry dishes I like to use the long, slender ones. They contain less water, so the end result is not mushy. The smaller round ones are perfect for stuffing.

I have been trying to grow them in the garden for the last couple of years. The first time I got exactly one fruit, but it was of good size. Last year was a total disaster as the unpredictable weather caused the plant to wilt and die. Hoping third time will be the charm...

Sometimes aubergines can have a bitter taste. You can toss the cut pieces in salt and leave them to drain in a colander for sometime. The salt will draw out the water and bitterness. Rinse them in water to remove the salt before you use them. I don't normally bother with this, unless I am frying them, as I don't think the ones we get here have any bitterness. 

This dish is very simple and quick to make. The garlic and roasted bengal gram bring out a mild sweetness that is balanced by the heat from the chillies. Desiccated coconut is preferred over freshly grated. It works well as a side dish for rice or chapattis.


1/2 kg aubergine (long slender ones preferable)
3 garlic pods, chopped finely
5-6 green chillies
5-8 curry leaves
1/2 tsp turmeric powder
4 tsp cooking oil

To powder
2 tbsp roasted bengal gram (pottu kadala)
1 tbsp desiccated coconut

  • Cut the aubergines into half inch pieces. They do tend to blacken slightly when exposed to air for a long time. Keep them in water if you are cutting it ahead of time.  
  • Grind the roasted bengal gram and the coconut to a fine powder and keep aside.
  • Heat oil in a pan. Add the mustard seeds when the oil is hot and allow them to splutter. Follow this with the curry leaves. Then add the aubergine, turmeric and the minced garlic and stir fry over high heat for a few minutes. The raw garlic will cook out, but you can add the garlic to hot oil for a few seconds before adding the aubergine. You have to be careful though as the garlic will brown very quickly and that doesn't taste very nice.
  • Add the salt and green chillies and cover and cook until the pieces are tender. The water contained in the vegetable should be enough to cook it. You can sprinkle some water if you starts to stick to the bottom. You are looking for the aubergine to be soft but not mushy.
  • At this stage add the ground powder and mix well.  Turn of the heat and cover and allow to cook in its own steam for a minute. You may not need the entire ground powder, just add enough to coat everything well and soak up any remaining liquid.

Sunday 5 February 2012

Strawberry and mango smoothie


1 cup halved strawberries
1/2 cup ripe mango chunks
1 cup orange juice
11/2 tbsp yogurt
1 tbsp honey (optional, not required if the mango is really sweet)
Handful of crushed ice


Blitz everything in a blender until smooth and serve. I skip the ice if everything else is straight from the fridge.

Saturday 4 February 2012

Carrot and badam(almond) kheer


40 whole almonds
21/2 cups milk (semi-skimmed or 2% is fine)
1/2 cup carrot, finely grated
3 tsp ghee (clarified butter)
1/3 cup + 1 tbsp sugar
1/2 tsp cardamom powder

Garnish
5-6 raw unsalted cashew, cut in half
10-12 golden raisins
  • To prepare the almonds, blanch them in hot water for a few minutes until their skin softens. Peel the skin and keep aside.  
  • Heat 11/2 tsp of ghee in a small pan. When it hot, add the grated carrot and 1 tbsp sugar. Cook the carrot till it's raw flavour disappears and starts to come together. It takes between 5-7 minutes.
  • Meanwhile, heat the milk in a nonstick sauce pan till it just starts to boil. Turn down the heat and allow to simmer.
  • Take about  half a cup of milk out and use this to grind the almonds to a paste in a blender. The paste should be just a tiny bit coarse to touch.
  • Add this back to the simmering milk along with the remaining sugar and simmer till the milk thickens and reduces a little. This will take about 20-25 minutes on a low flame. Keep stirring occasionally so it doesn't catch at the bottom.
  • Finally add the cooked carrot and mix well. Continue to simmer for another 5 minutes. 
  • Turn off the heat, add the cardamom powder and mix well.
  • Heat the remaining ghee in another pan. When it is hot, add the cashew and stir till it begins to turn golden brown. Add the raisins and continue to stir till the raisins plump up. Mix this into the prepared kheer. 
  • Cool and refrigerate for 2-3 hours. 
This tastes best when it is served cold. This makes about 2 generous servings or 3 regular ones.

Tip: Rinse the sauce pan in cold water before adding the milk. This mostly stops the milk from catching at the bottom.

Kerala style soy bean and potato curry

Mum makes this with Avarakkai (broad beans) when it is in season in Bangalore. I have used frozen soy beans instead. The gravy is actually the same as Kerala kadala(black chickpea) curry of the "puttu and kadala" combination.

The heat in this curry comes from the pepper corns rather than the red chillies, so don't skimp on that. The tomatoes add the sourness to the curry. If you don't have them handy, they can be substituted with a little bit of tamarind pulp/paste.


2 cups frozen soy beans
3 small potato, cut into cubes
2 tomato, quartered and chopped into large chunks
1/2 tsp turmeric powder
Salt to taste

To grind
2-3 whole dried red chilli
2 tbsp whole coriander seeds
1/2 tsp cumin seeds
6-7 whole pepper corns
3-4 garlic pods, roughly chopped
1 inch ginger, sliced
5-6 curry leaves
1/2 large onion, roughly chopped
1/3 cup freshly grated coconut
11/2 tsp oil

Tempering
1 tsp black mustard seeds
2-3 whole red chili, cut into pieces
5-6 curry leaves
3 tbsp onion, chopped finely
11/2 tsp oil

To prepare the ground masala
  • Heat oil in a pan. Add the red chilli when the oil is hot and sauté for a 10 seconds. 
  • Next, add the chopped garlic and ginger and sauté till the garlic is cook and just starts to turn colour. 
  • Add the coriander seeds, cumin and curry leaves and sauté till the coriander is well roasted (starts to turn light brown).
  • Add the pepper corns and toss for a few seconds and then follow it with the chopped onions. Sauté for a couple of minutes, just to remove the raw taste of onions.
  • Add the grated coconut and continue to stir. You want to allow the coconut to cook in  the oil, but not brown. Turn off the heat when the coconut just starts to brown.
  • Allow it to cool slightly. Grind the mixture with a little water to form a fine paste.
To prepare the curry
  •   Add the soy beans and potato into a pot. Add salt, turmeric and 11/2 cups of water and bring to a boil. Cover and simmer over a low heat till the potatoes are half cooked. 
  • Add the ground paste and continue to simmer till the potatoes are done. 
  • Finally add the chopped tomatoes and bring back to a boil. The gravy should be slightly thick and of pourable consistency. Add extra water if needed.
  •  Allow it to boil for a  2-3 minutes and then turn off the heat.
  • Heat the oil for the tempering in another pan. When the oil is hot, add the mustard seeds and allow them to splutter. Next, add the broken red chilli and curry leaves and stir for a few seconds. Finally add the chopped onion and sauté till the onions and nicely browned. 
  • Add the tempering to the curry. Serve with rice, puttu or even rotis.